The art of creating star trails is actually really simple. The apparent motion of the stars across the sky is due to the rotation of the Earth. By placing your camera in a fixed position means that you can capture this motion by taking lots of long exposures and stacking them in software.
Equipment:
•Camera: Ideally a DSLR but any camera will do that can take continuous shots.
•Lens: Anything between 10mm and 50mm is ideal. If you are imaging a foreground object or landscape scene then the wider the better.
•Tripod: Nice and sturdy.
•Memory card: A large storage card is best as you will take at least 100 images.
•Intervelometer: To control your camera hands free to reduce camera shake when pressing the shutter. Most Canon DSLR’s can also be controlled from an Android tablet with the correct USB lead and apps like “DSLR Controller”.
Optional:
•Lens dew heater: These stop your lens from fogging up. “CooWoo” heaters are best as the heat can be regulated.
•Small power bank: To power your lens heater.
•Hot beverage: Whatever takes your fancy.
Pre-Planning:
To start with, if you want a foreground object like a building or tree line, then the first thing to do is a bit of research. Star trails can be created in any direction, but if you want to capture the iconic "vortex" then your camer needs to be pointing to the north star, Polaris. By searching for your subject on Google Maps first you will give yourself an idea of which way your subject is facing. You will then be able to work out where you can (or cannot) setup. You can also work out which way you will face and in turn which way your star trails will go.
A great app that does this for you is called PhotoPills. you can input your camera and lens configuration and it will show your field of view from any give dropped pin on the map.
Once you are happy that you can see north and that you have a good idea of where you will set up it is a good idea to keep an eye on the Moon phase and position on the night that you want to image. The Moon is great for lighting up your subject or any surrounding landscape without the need to light it up with artificial light.
Once you have all this information then its time to head out. It is usually best not to go alone unless you really know the area you wish to go to and that it is safe for you to be alone there. It also helps to pass the time if you have someone to chat to. If you can, try to arrive in daylight or during sunset so that you can set up while you can see what you're doing. If this isnt possible then remember to take a decent head torch. Make sure that it has a red setting as this will preserve your night vision especially if you are setting up in the dark.
Step 1:
The first thing you need to do is find the best vantage point to place your camera. To get perfectly round star trails you will need to place Polaris as near to the centre of the image as possible, so take this in to account when setting up your tripod. Attach your camera to the tripod and plonk on your desired lens. Always put the lens heater on at this point as you may knock out your focus if you put it on last.
Step 2:
Frame up. As mentioned earlier, if you have a foreground subject or picturesque landscape, ensure that it is to the bottom of your image. You could also place the subject to the left or right of the image if you so wish.
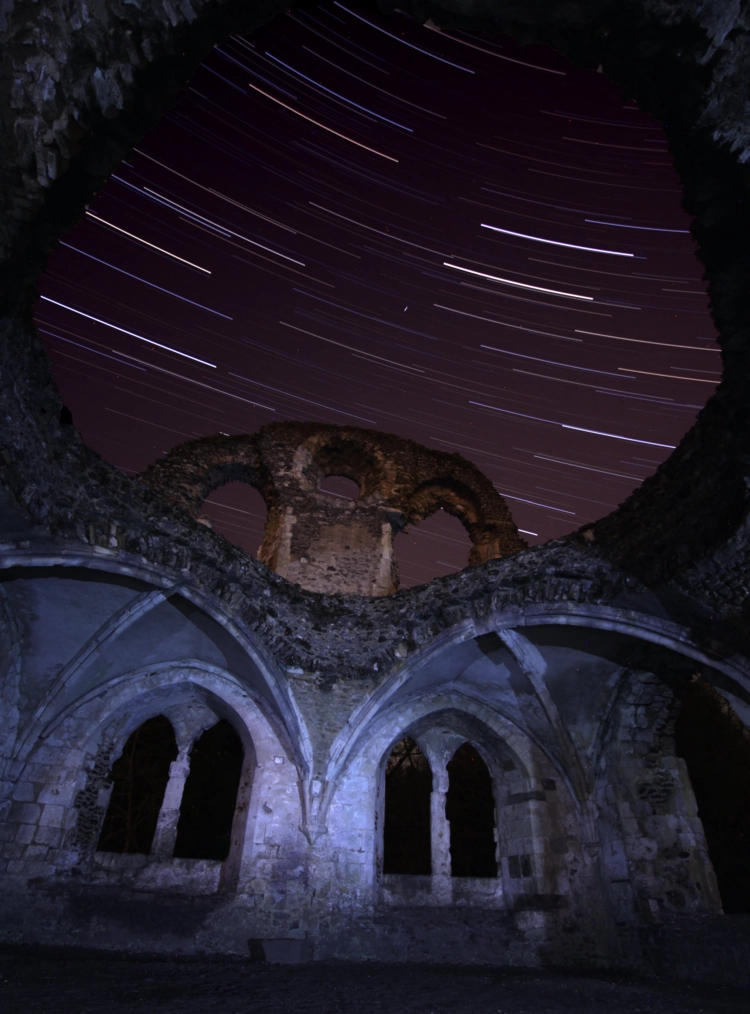
Using an ultra wide lens like a 10mm or 14mm lens then you will easily fit your subject in the bottom which leaves plenty of room for the star trails to occupy the upper half. Play about with both landscape and portrait modes as you may find that one is better than the other. Tall objects like towers work best in portrait whereas castles, hilly landscapes, dew ponds and even churches are best taken in landscape mode. You could even take trails from inside a building if you can see enough of the sky (See image). Take a few test shots and see which works best and make sure that you're happy with the framing.
Step 3:
Focusing, Most of the time you should focus on the foreground subject. The stars actually show up better when they're ever so slightly out of focus. Either way you will not notice as they will be trailed once stacked. The best way to do this, especially in the dark, is to shine a torch on the subject and focus on that. If you cannot focus on the foreground object then you will be fine focusing on a bright star. The easiest way to do this is to point your camera in the direction of a bright star and take an 8 second exposure. Take note of where the star is in the exposure and
move your zoom box to the same position on your live-view screen. You can now do your 5x or 10x zoom and the star should be there. The star needs to be made to the smallest pin point that you can make it as this will mean that you’re focused to infinity. Some lenses have an infinity mark on them but it is usually not in the correct position so once you have got the star to its smallest point then you can mark this on the lens for future reference.
Step 4:
Now it's time to set your ISO. Firstly, put your camera's exposure setting to 30 seconds or the longest that your camera will allow (you can take longer by utilising the "bulb" setting, but there really is not much point taking longer single exposures than 30 seconds for star trails).
Set your ISO to around 400 and take a test shot (all imaging from now on will be at 30 seconds). If this test shot looks good then move to the next step, if not, adjust the ISO until you find one that you're happy with. Keep in mind that if the Moon is due to rise after you have started imaging than you will need to set your ISO lower as the Moon will over expose your subject as it rises. Try to image while the Moon is either already up or down to get consistent light throughout the imaging session.
Step 5:
Make sure that your camera is set to the continuous shooting mode (3 boxes one on top of the other) and that you are imaging in either JPEG only or Raw & JPEG. This will depend on what stacking software you will be using, some only accept JPEG like StarStax where some take RAW files like Sequator.
Make sure that your lens heater is on when shooting in the colder months or if you think dew will be an issue.
If you have an intervelometer then set it to take at least an hours worth of 30 second exposures.
When you are happy with all of the above then press go.
Now sit back and enjoy the stars for the next hour or two. There is no need to touch your camera from now on. The only time you will touch it is to stop the imaging run at the end.
The longer you leave the camera imaging, the longer the trails will be in your final image.
Once you have collected all of your data then its time to pack up and head home.
Once home, download all of the exposures to your PC and put them through the software. StarStax is renowned for being the easiest and quickest. Just drag all the exposures in, select "gap filling" then click the "start processing" button. It will stack your images and you will see your trails getting longer as you watch. Once that’s done, save the image and process it in something like PhotoShop, or whatever software you prefer to use.