Affinity is a "one-stop" shop for astrophotography stacking and processing all in one handy bit of software. The processing is similar to PhotoShop but with some additional and more powerful tools. Unlike PhotoShop, Affinity is a one-off payment of £67.99
For this tutorial I have used the subs taken via my ZWO Seestar to show how easy Affinity is to use when both stacking and Processing. This will be exctly the same process for other smart telescopes like the Dwarf II or any other telescope setup, be it smart or traditional.
The additional bonus of the Dwarf II is that you can take your own dark callibration frames and this tutorial touches on how to add them during the stacking process.
I will only cover the very basics of processing which will get you a much better result than just using the stacked image straight out of the smart telescope. There are plenty of tutorials on how to further process in Affinity to make the most of your hard work in collecting the data.
This is a very simple set of processing tools that will get you used to using some of the basic tools in Affinity. There are plenty more tools and methods to further process like background extraction, noise removal, sharpening etc... but I will not cover those here.
Stacking
Firstly, you need to remove the individual subs (otherwise called light frames or lights) from the device or camera you have used to capture your target.
Smart telescopes are usually connected to your computer via WiFi or a cable. DSLR subs are also transfered via a cable or by inserting the SD card into the computer. If you have multiple sessions on a target, ensure that these sessions (along with each sessions callibration frames) are in seperate folders.
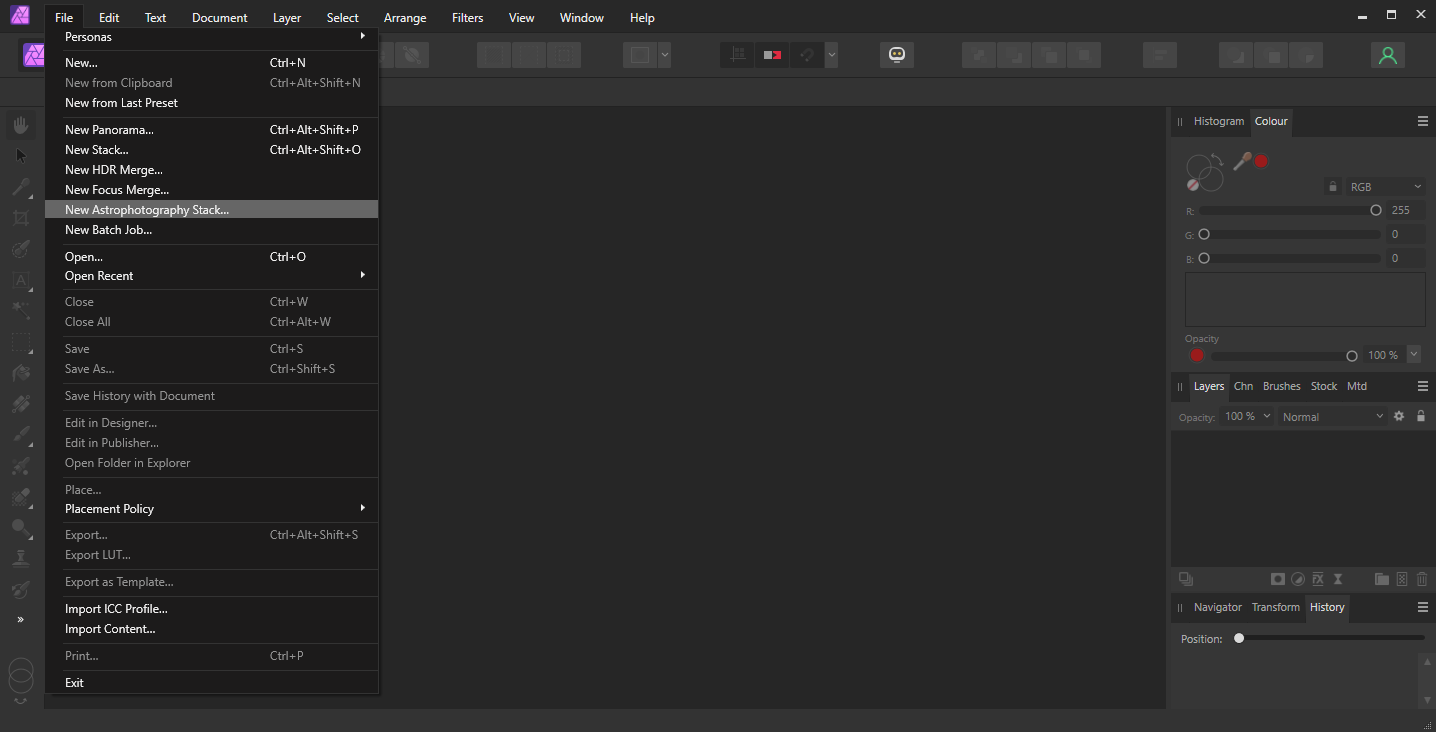
1) Open Affinity Photo and click on "File" in the top menu bar.
2) Click "New Astrophotography Stack"
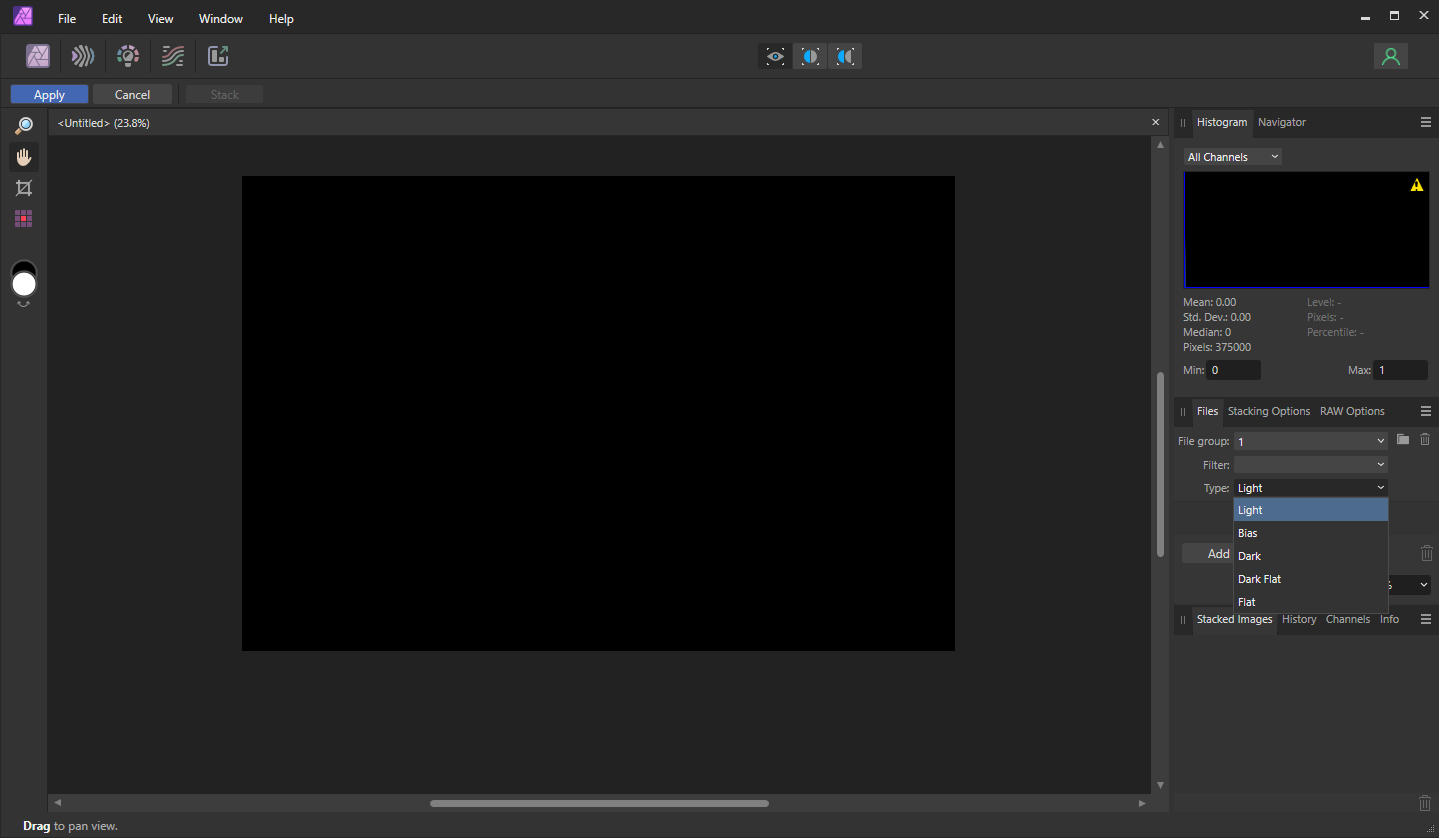
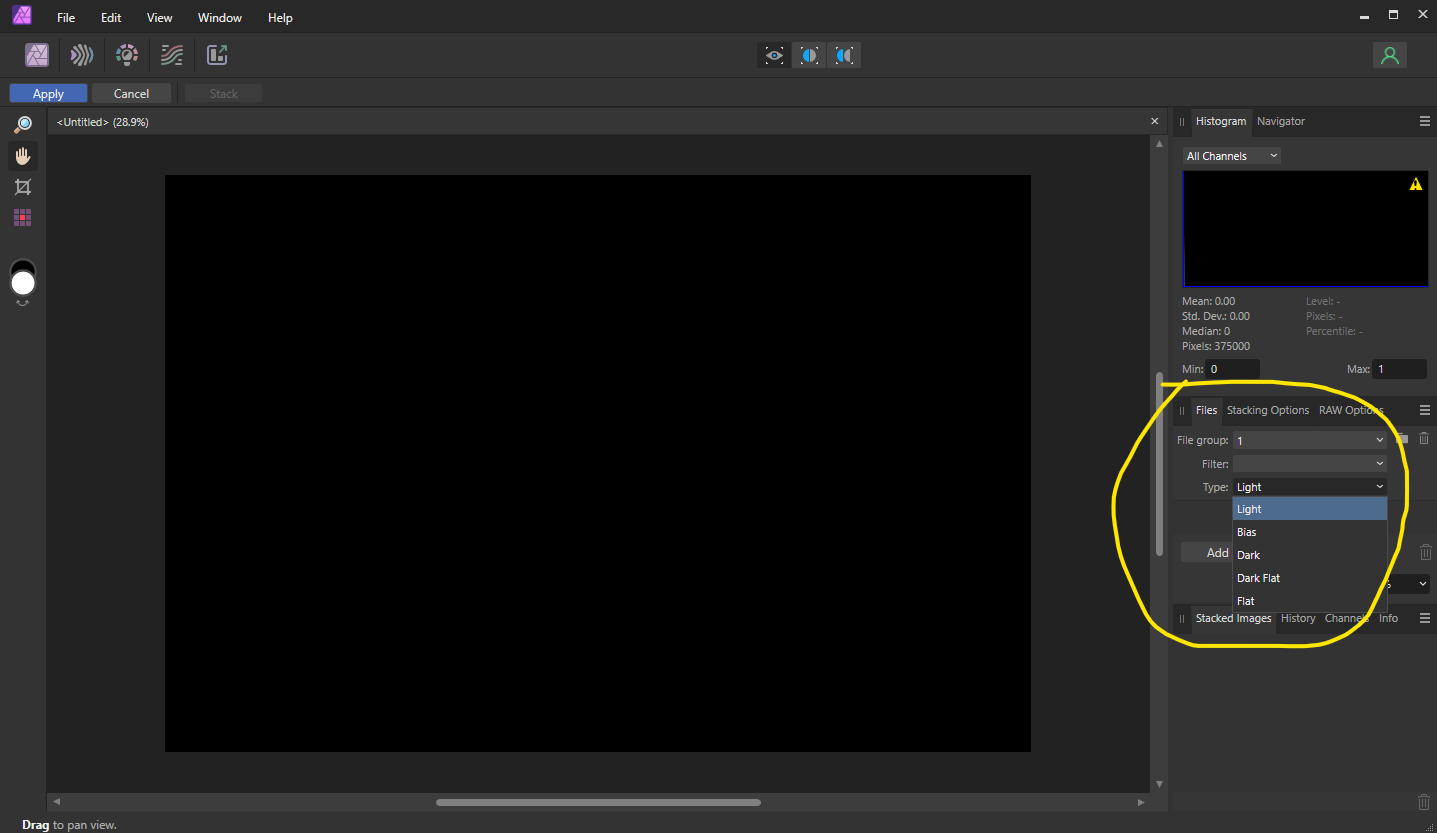
3) When the window changes, click the "Files" tab in the box on the right side of the screen. Select "light" in the "Type" dropdown, then click on "Add Files".
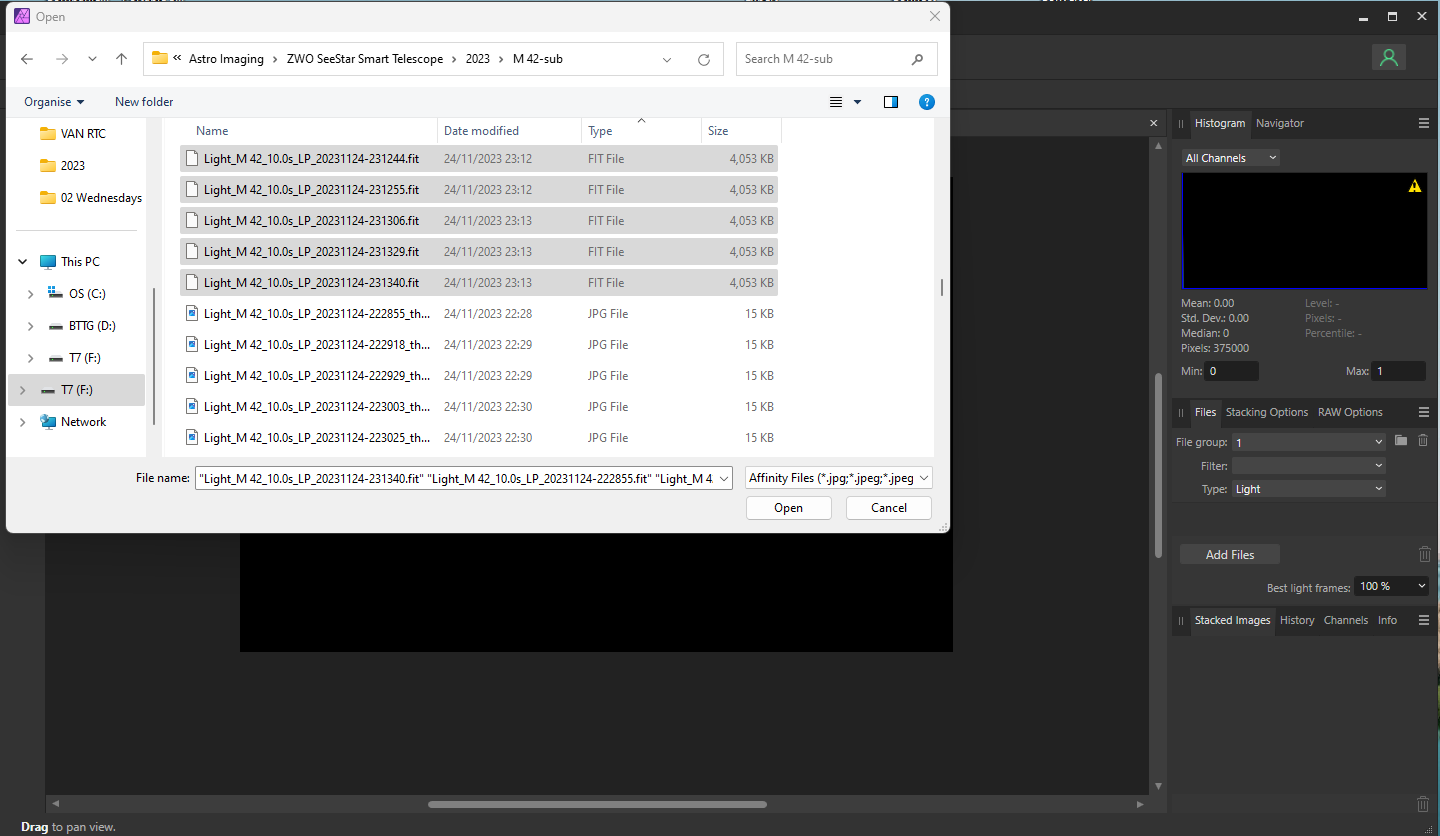
4) Select ONLY the fits files and click "open" to add these files to the stack.
4-a) (OPTIONAL) If you use a Dwarf II or standard telescope setup and you have your own dark, flat or bias callibration frames then select these from the "Type" dropdown and "Add Files" from your dark/flat/bias library in the same way as your lights.
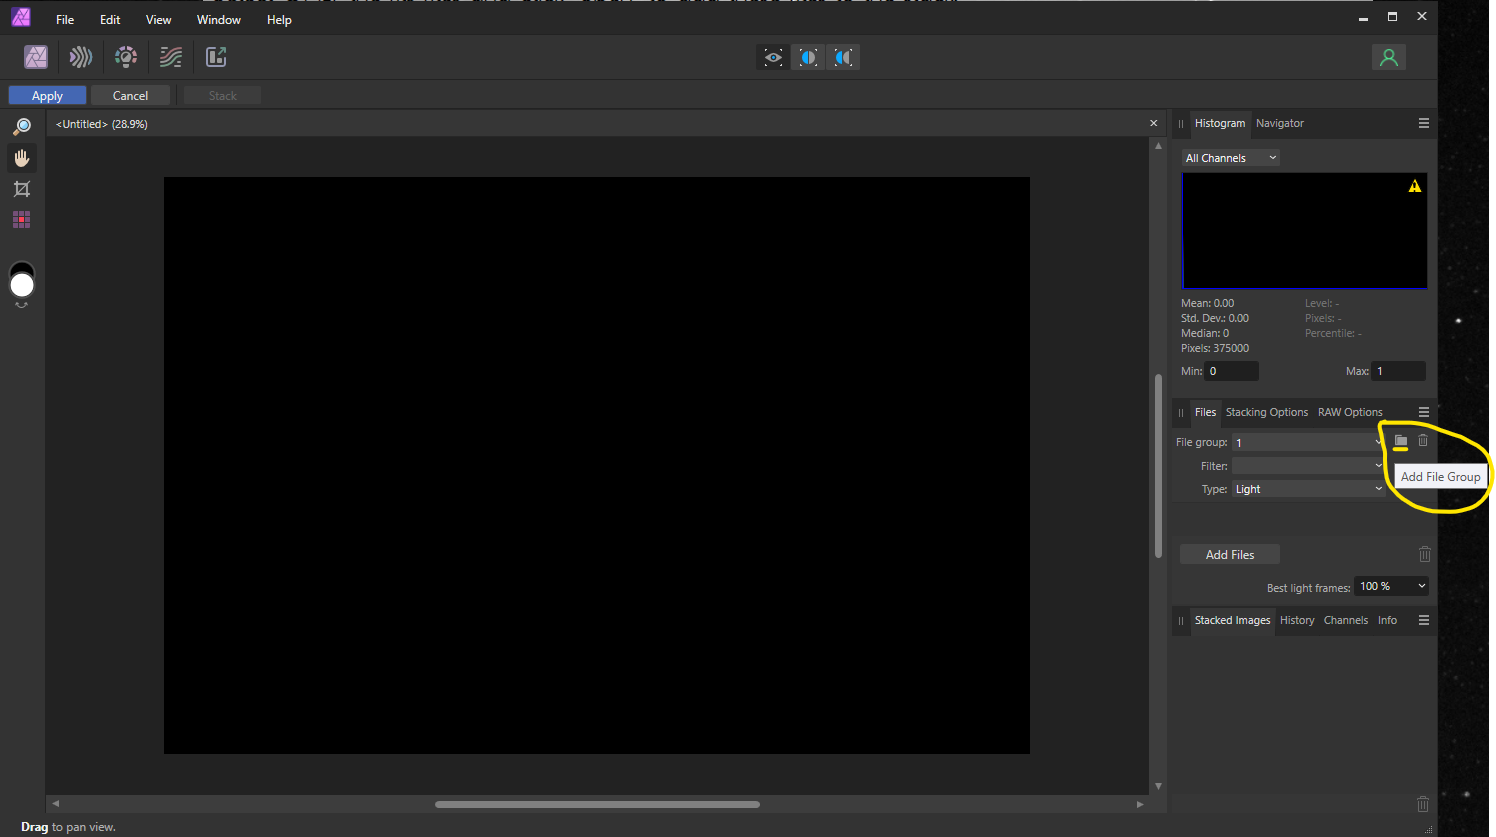
4-b) (OPTIONAL) If you have multiple imaging sessions on the same target then you can create a file group for each session. Just click on the Folder icon and a further group will be added. You then repeat the above steps by addding the additional sessions lights / darks / flats. You can repeat this for all sessions taken on any particular target.
The reason for this is because your callibration frames are focus - temperature - and exposure time specific. One or all of these variables may change from night to night. By creating File groups the correct dark/flat/bias frames are only applied to their respective light frame group during the stack.
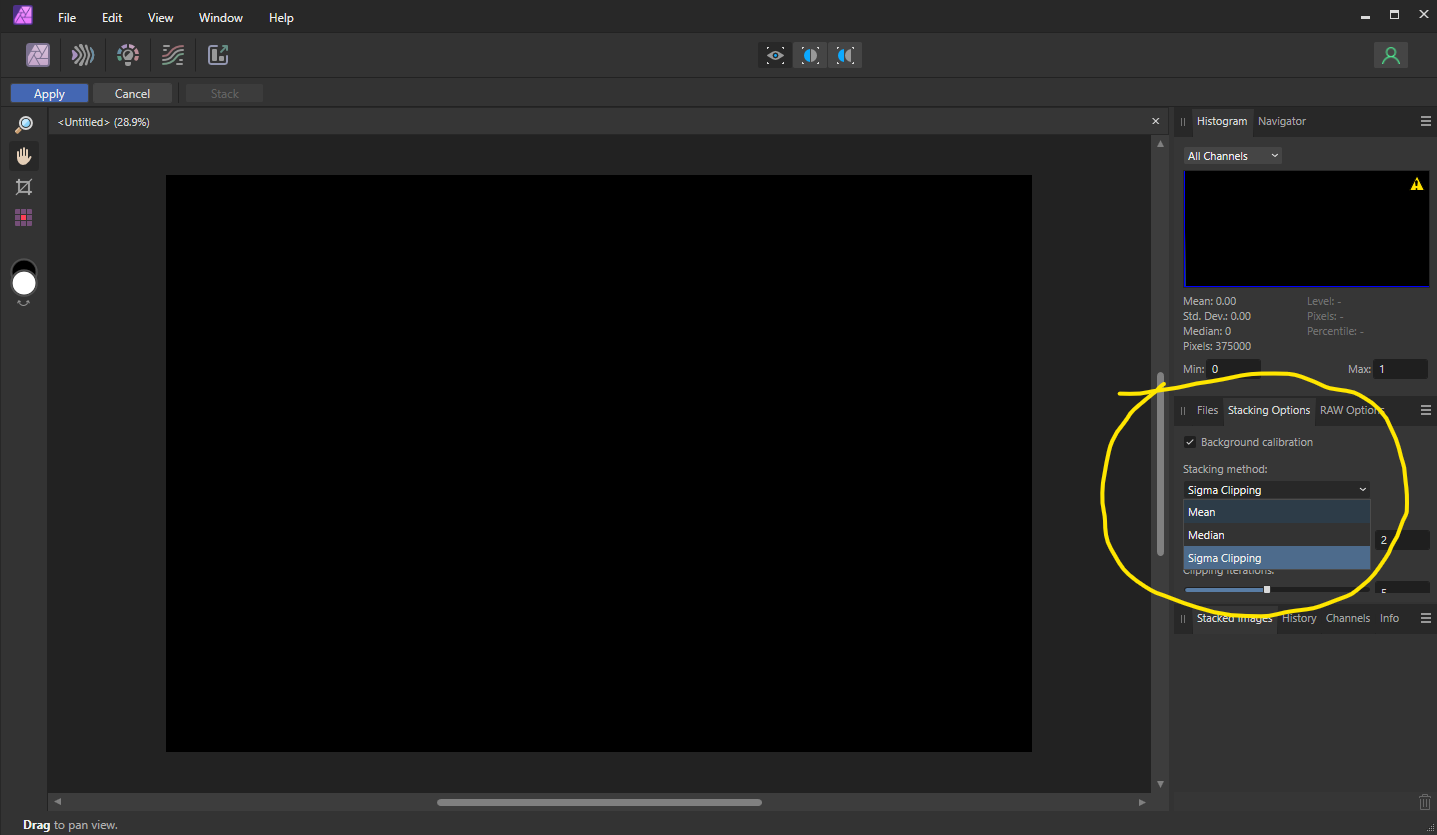
5) If you have planes or satellites in your images then select "Sigma-Clipping" in the "Stacking Options" tab. This will remove them during the stack.
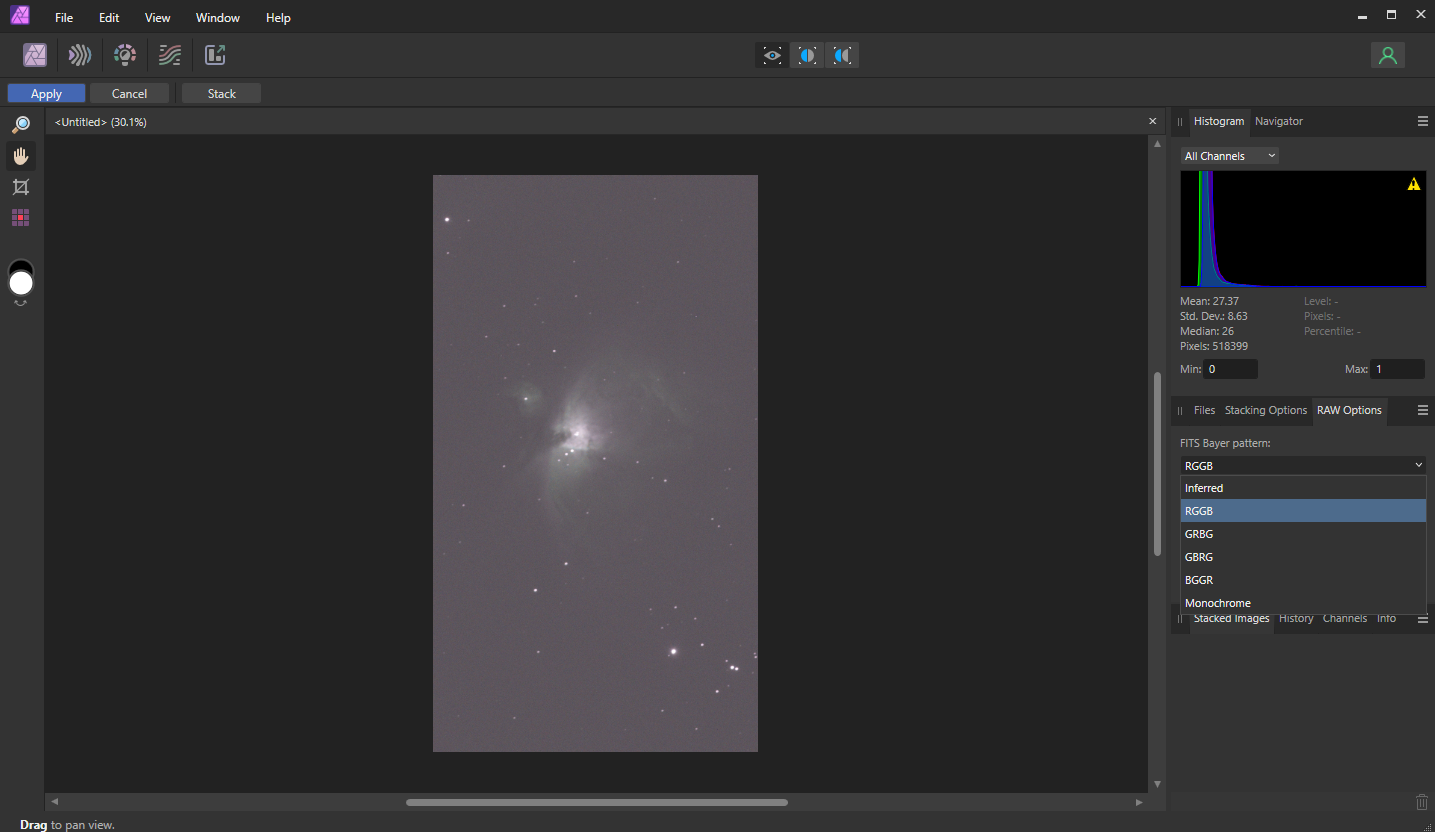
6) You can change the Bayer Pattern if required by clicking on the "RAW Options" tab and selecting the correct pattern from the dropdown menu.
7) If you have included dark callibration frames then click on the gray square with the red centre on the left hand panel under the "Apply" button. this will find any hot or cold pixels and any amp-glow that may be present and it will subtract these from the lights during the stacking process.
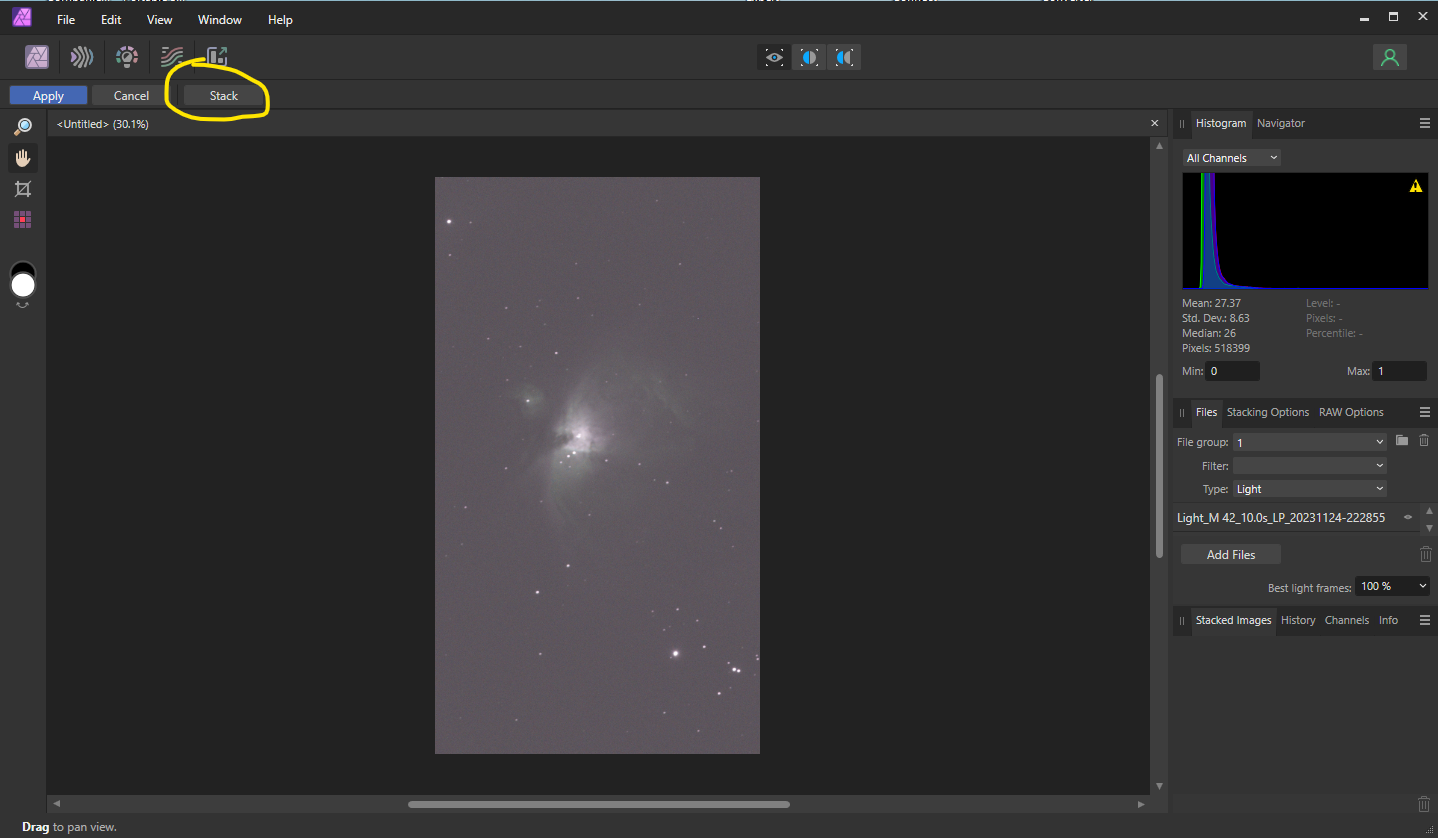
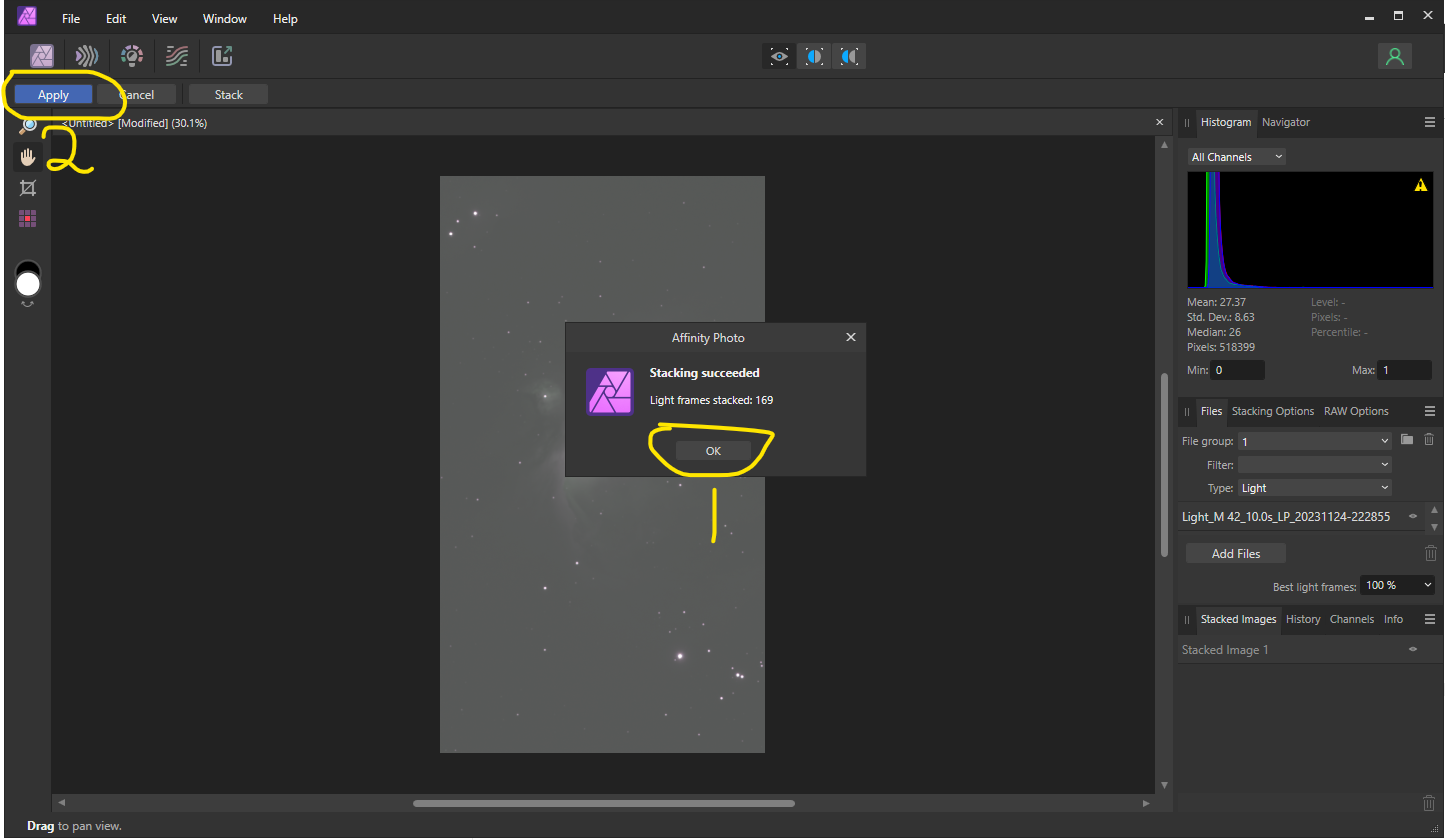
8) Click "Stack" and Affinity will start the stacking process.
9) Once stacked, click "ok" ( 1 ) then click "Apply" ( 2 ). This will then send the stacked image to the Photo Persona for further editing in Affinity.
Basic Processing
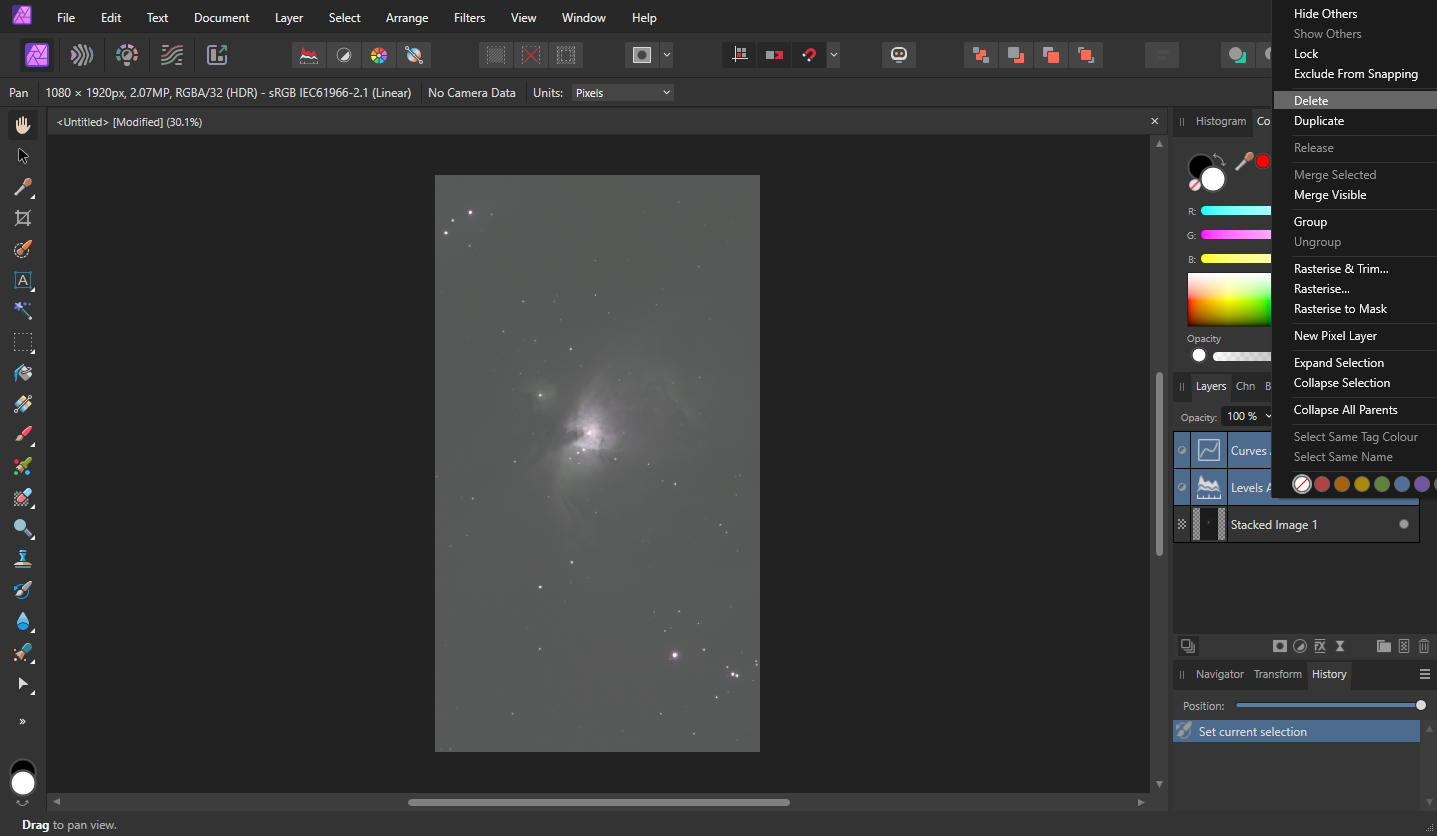
Now that the stacked image is open in the Photo Persona you will see that a Levels and a Curves layer have been added above the stacked image layer. It is perfectly ok to use these if you wish by double clicking on each thumbnail, but I like to delete these and start from fresh. Just select both with "shift & click" then right click and delete.
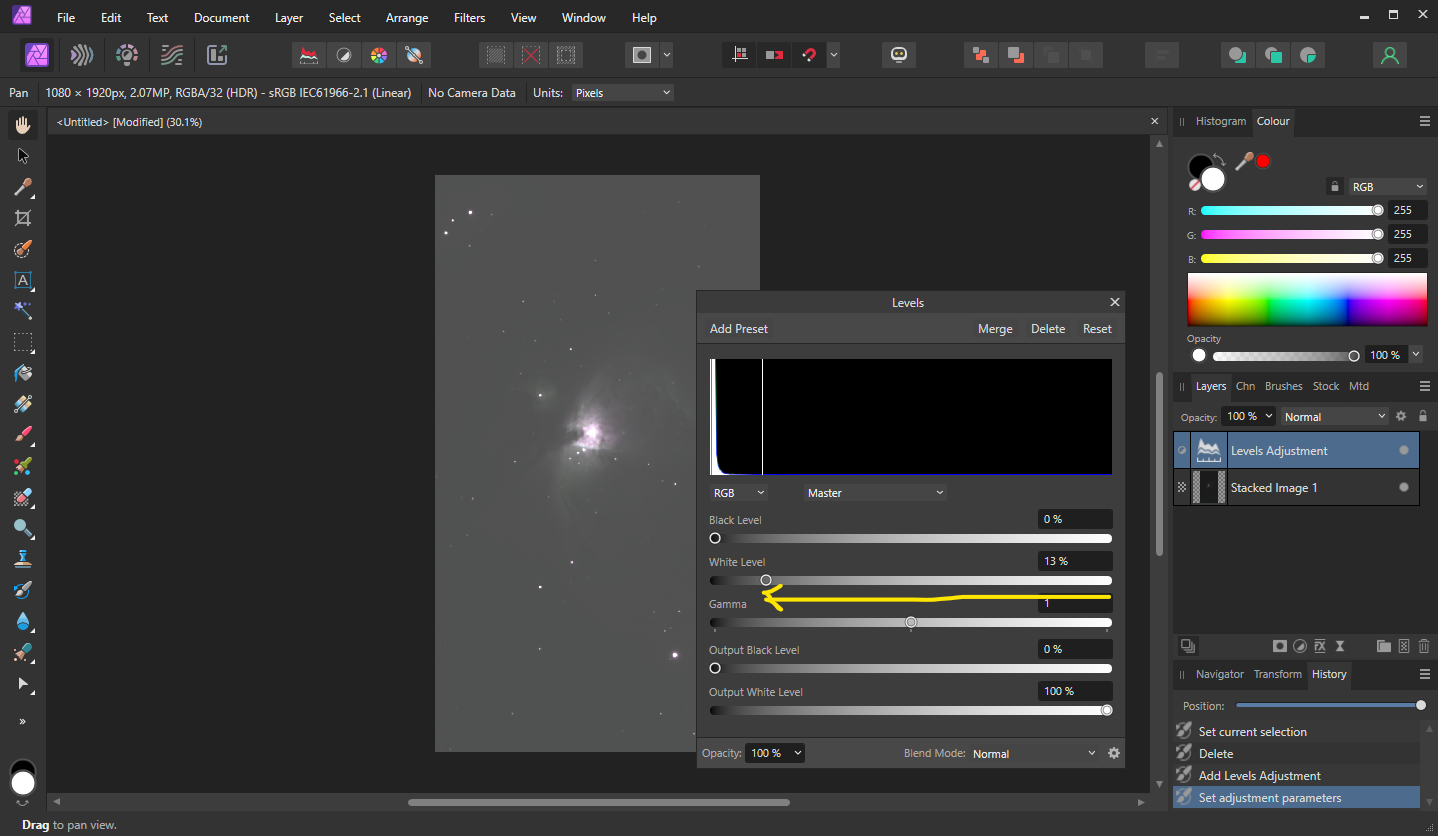
If you delete the two pre-set layers then you will be left with the basic stack. We can now brighten our stack with some Level tweeking. Click the "Add new Layer" symbol ( 1 ) then click "Levels" ( 2 ).
This will add a Levels layer and open the settings for the levels to be tweeked. Just by moving the "White Level" slider to the left will significantly brighten our image. Make sure that you do not allow the thin line on the histogram to go past the peak on the left which is the representation of our captured data. Now click the X on the levels box to close it.
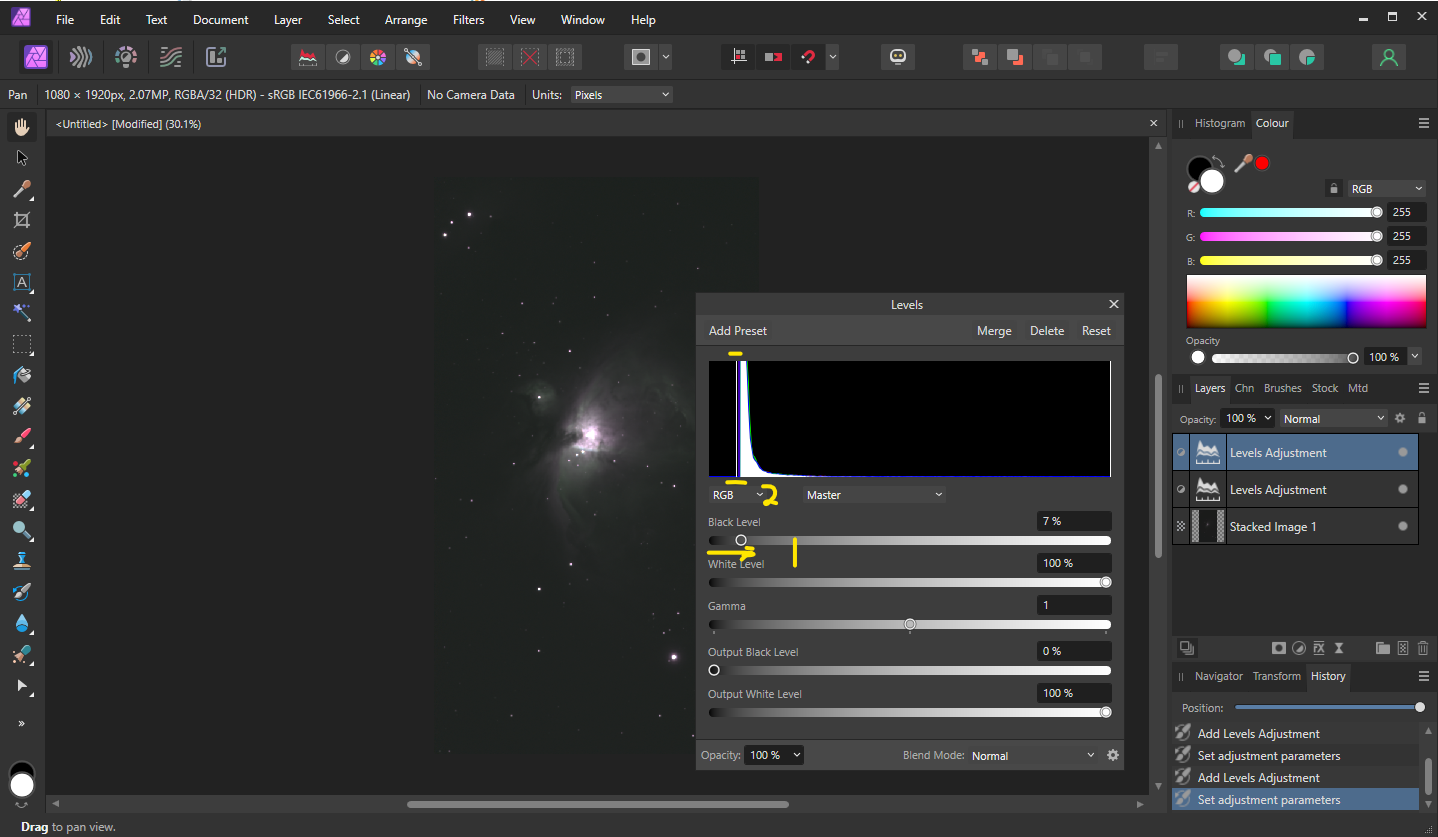
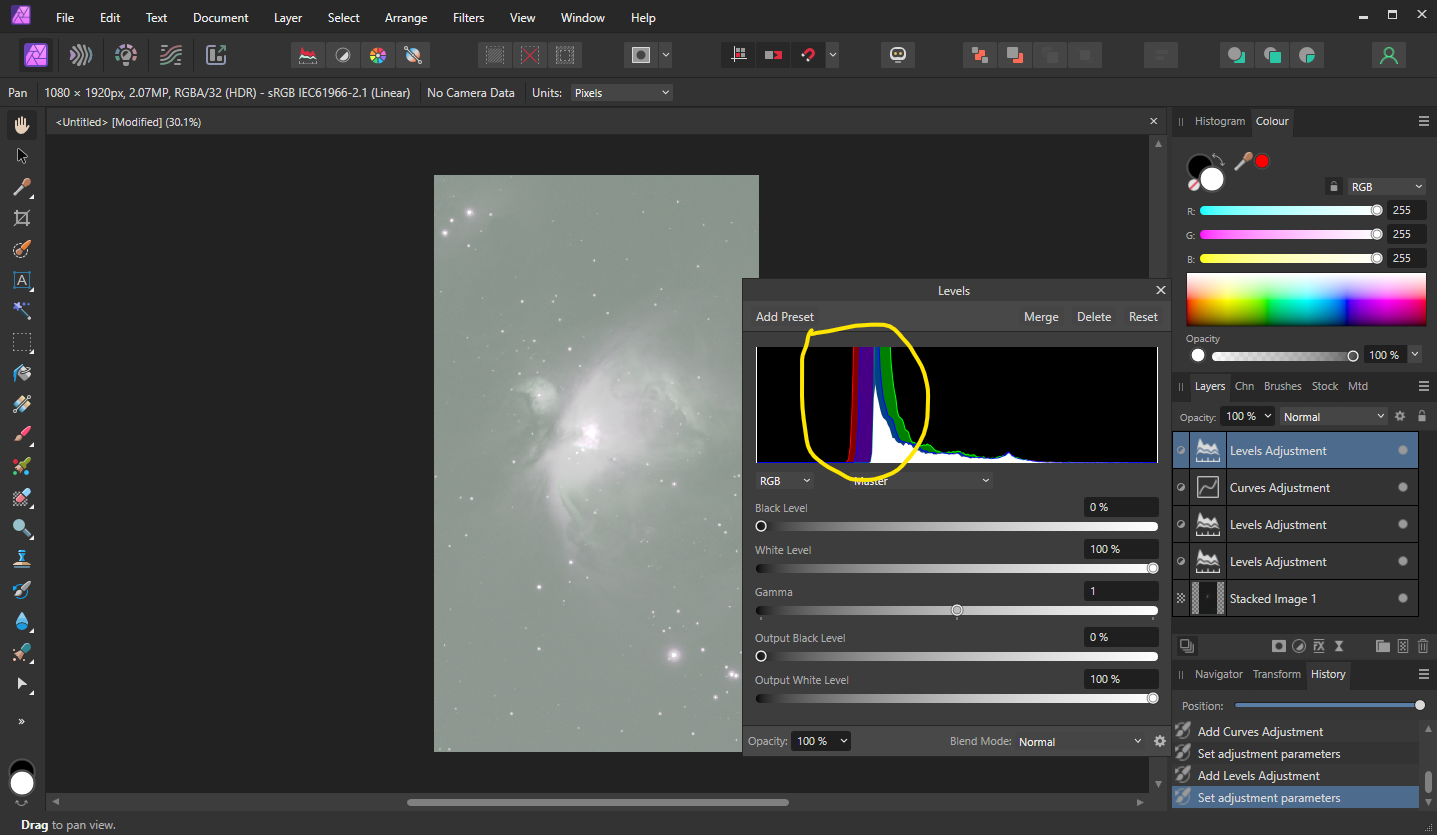
Add another "Levels" layer as before and you will now notice the histogram has moved more to the right. We need to now set the black point by moving the "Black Level" slider ( 1 ) to the right until the line is close to the histogram peak ( 2 ). Again, do not go all the way to the line, leave a small gap. Click the X to close the levels box.
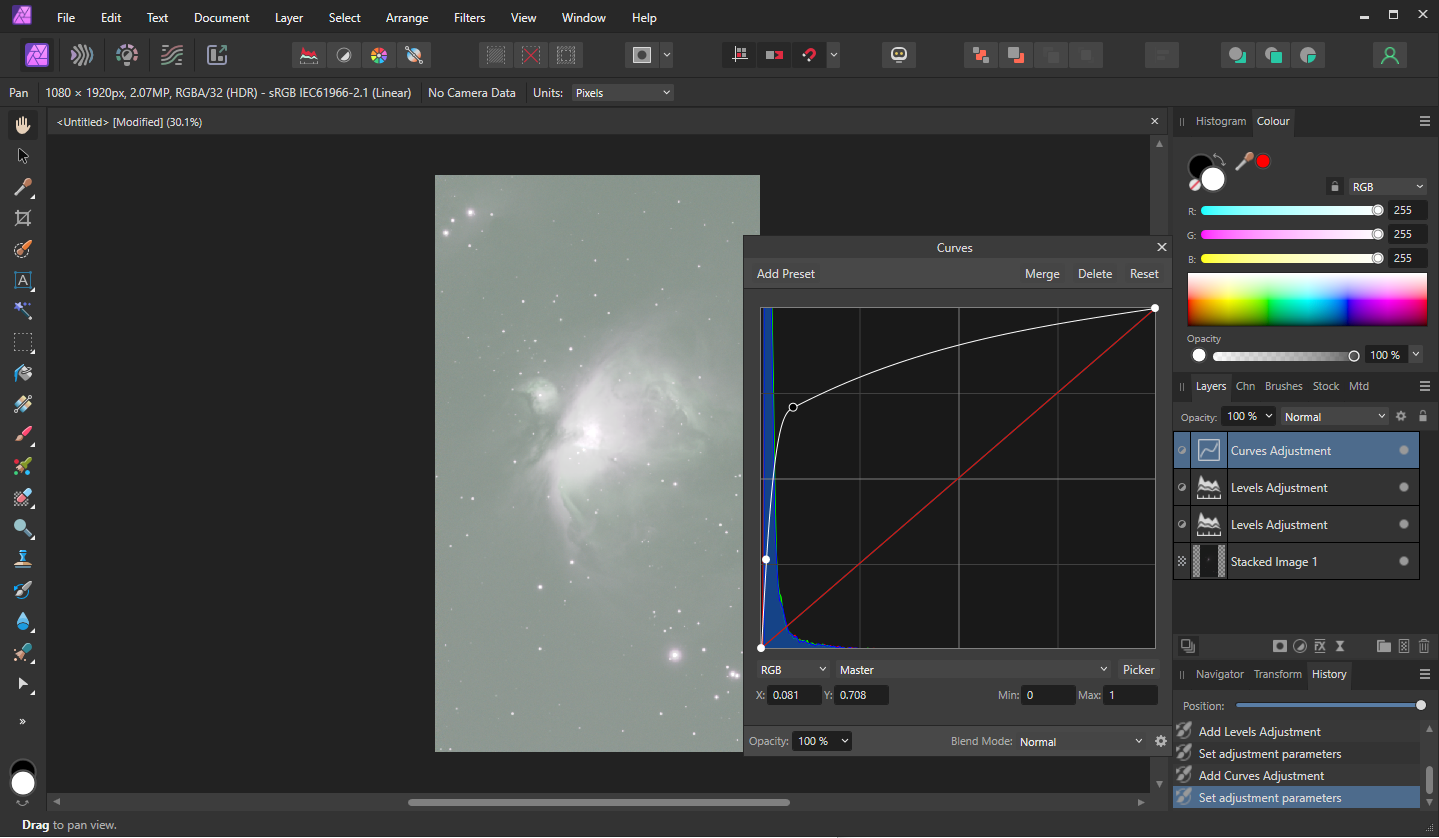
Now click on the layer symbol and open a "Curves" layer. You will see a diagonal line running from the bottom left to the top right. Click on the line close to the bottom left and drag the line up and to the left. Then add another handle by clicking the line further up. Try to get a line in this general shape. You will notice how much this brightens the data. Be careful not to over expose / blow out the bright core of the Nebula or stars. Click the X to close the Curves box.
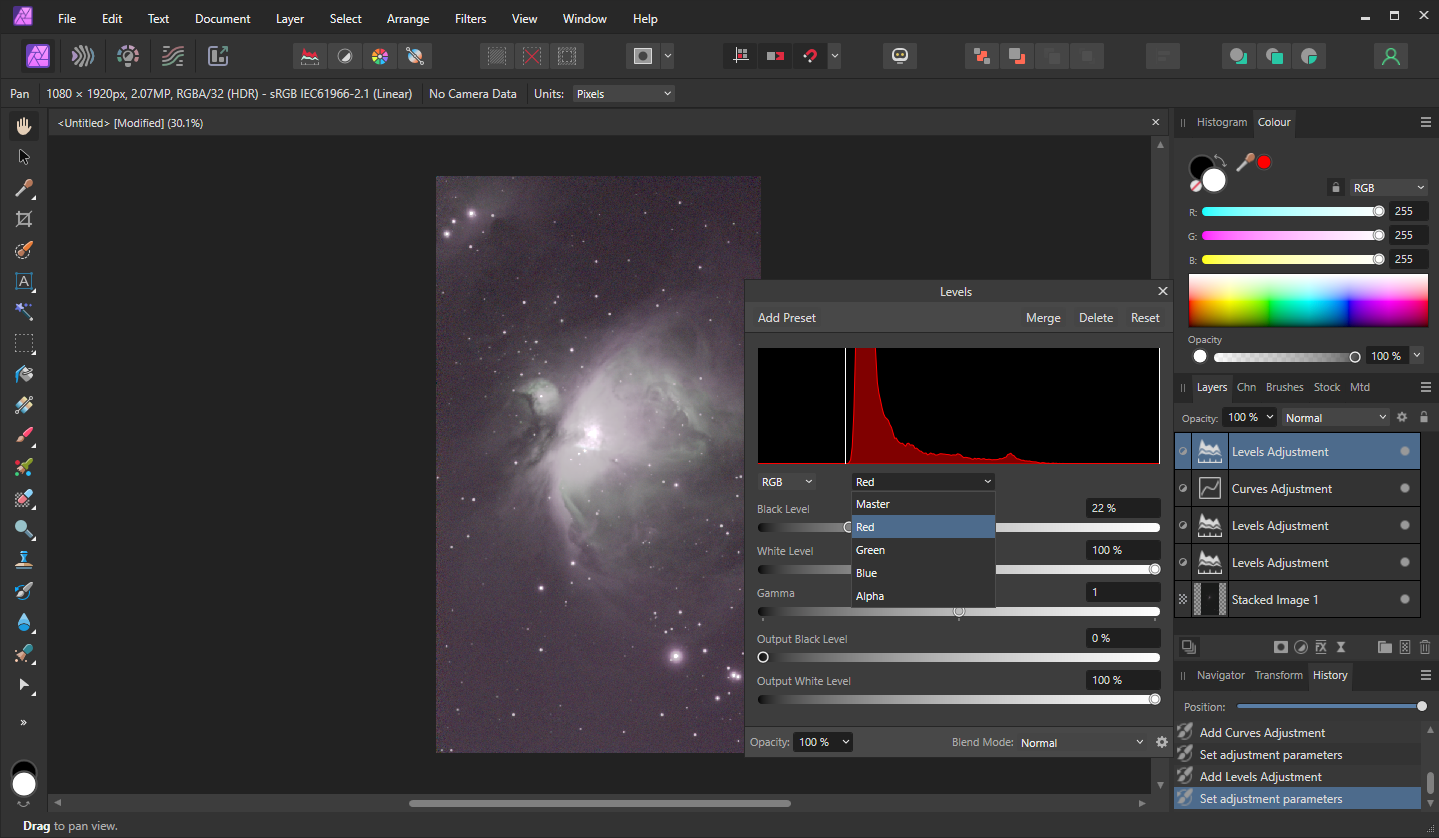
Now open another levels layer and you will once again see the histogram peaks have gotten fatter and moved more to the right. If the colour chanel peaks are level with eachother then you can just slide the "Black Levels" slider to the start of the histogram peak. If each chanel is not in line then we need to align them. See the next step.
You may now click each colour chanel and bring the Blcak Levels slider to the begining of each respective peak. Do this for the Red, Green and Blue chanels. Click the X to close the levels box.
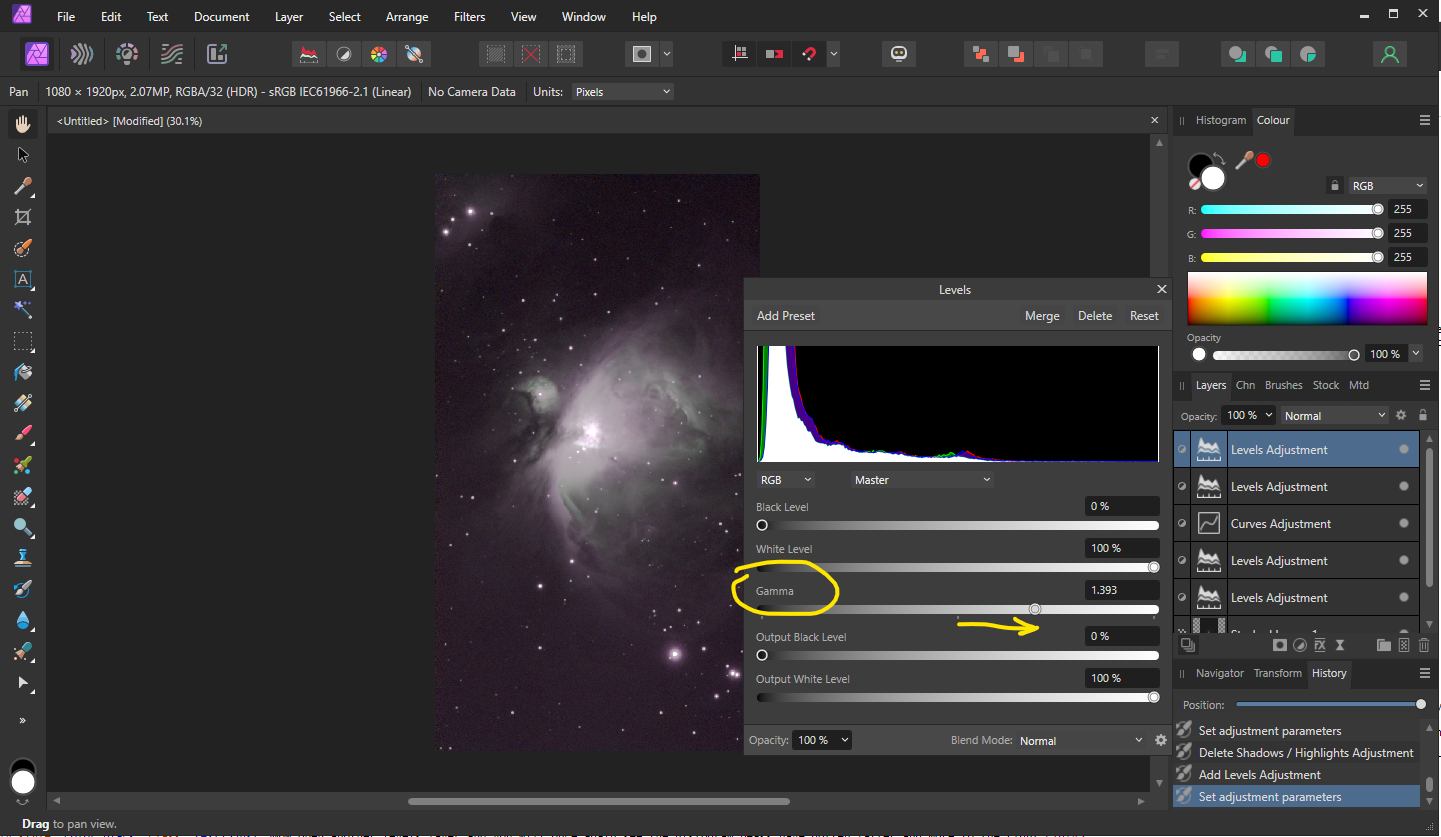
You will notice that the core looks a bit "flat". Open another levels layer and slide the Gamma to the right. Click the X to close the box.
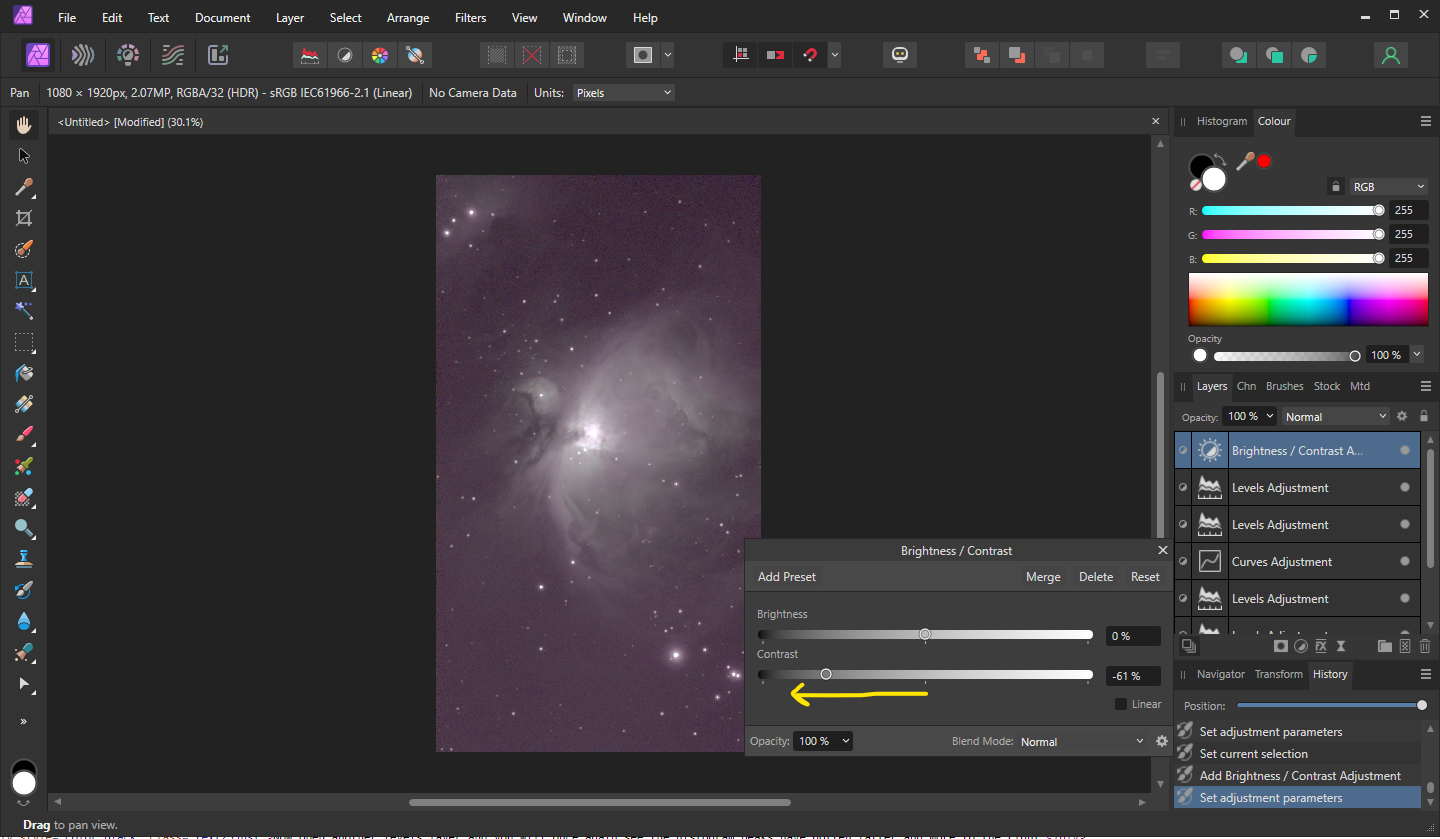
Now open a "Brightness & Contrast" layer and slide the contrast to the left. Click the X to close the box.
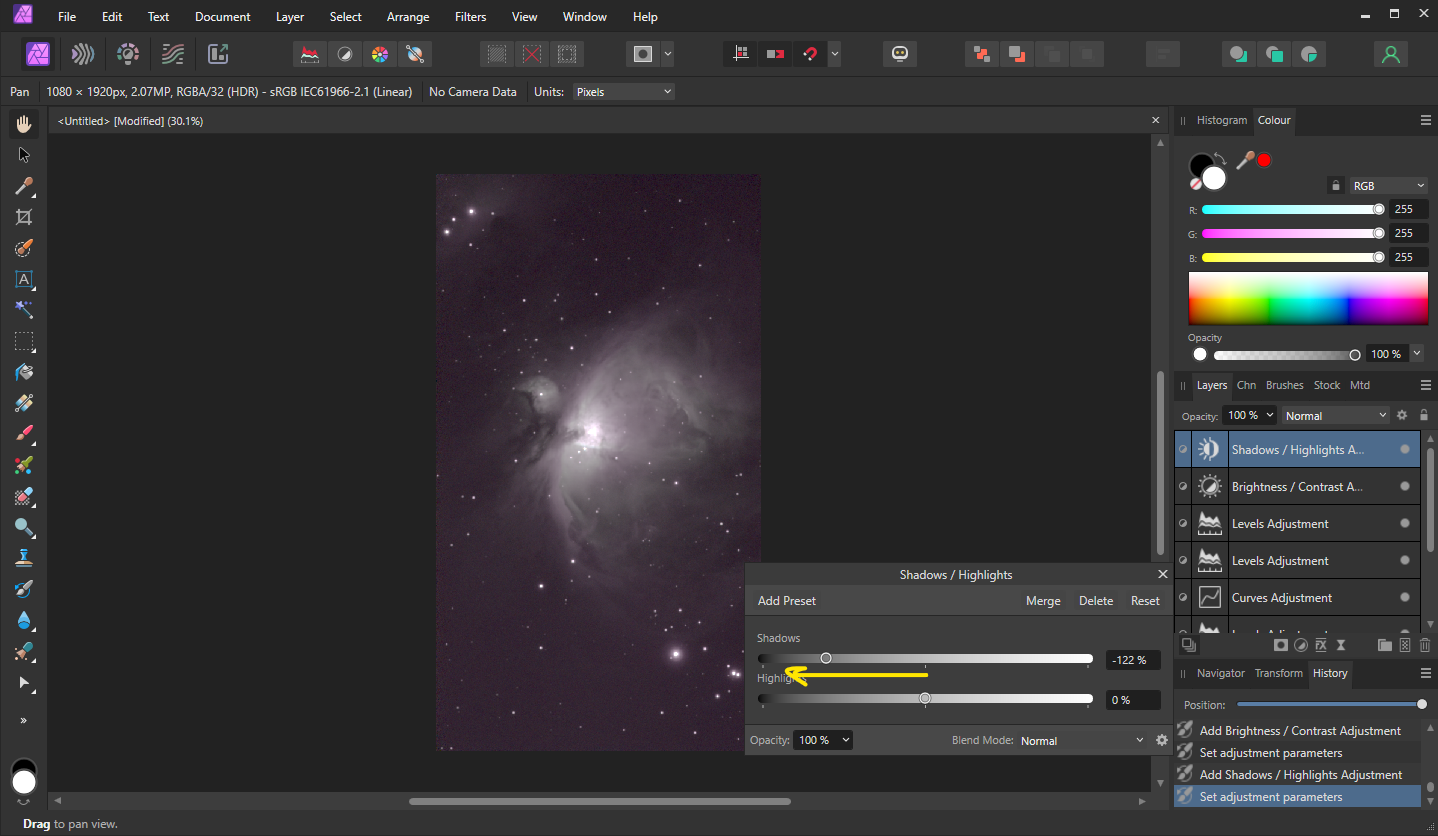
Now open a "Shadows & Highlights" layer and slide the shadows to the to the left. Click the X to close the box.
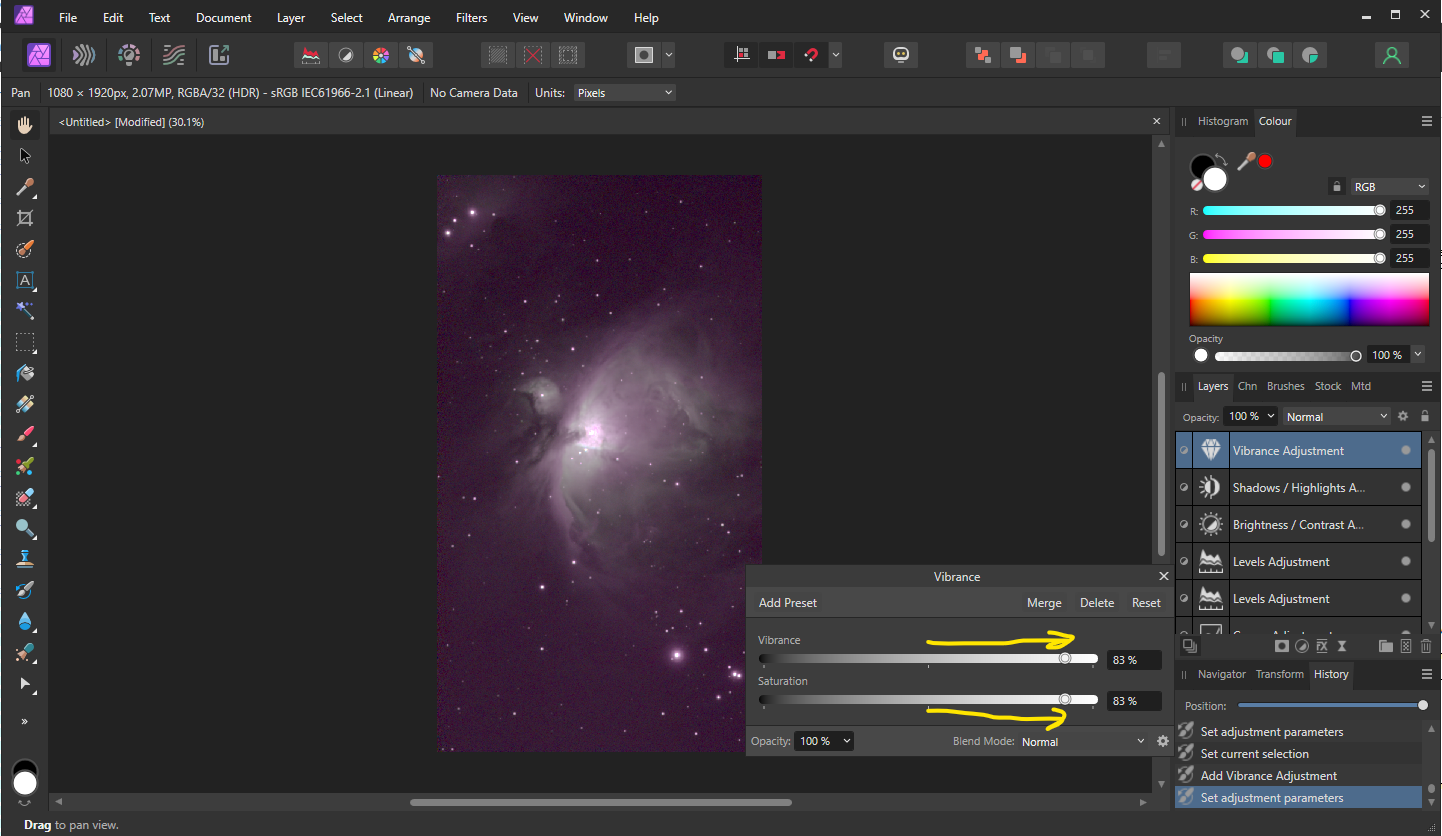
Now to get more colour. Open a "Vibrance" layer and slide the Vibrance and Saturation sliders to the to the right. Click the X to close the box.
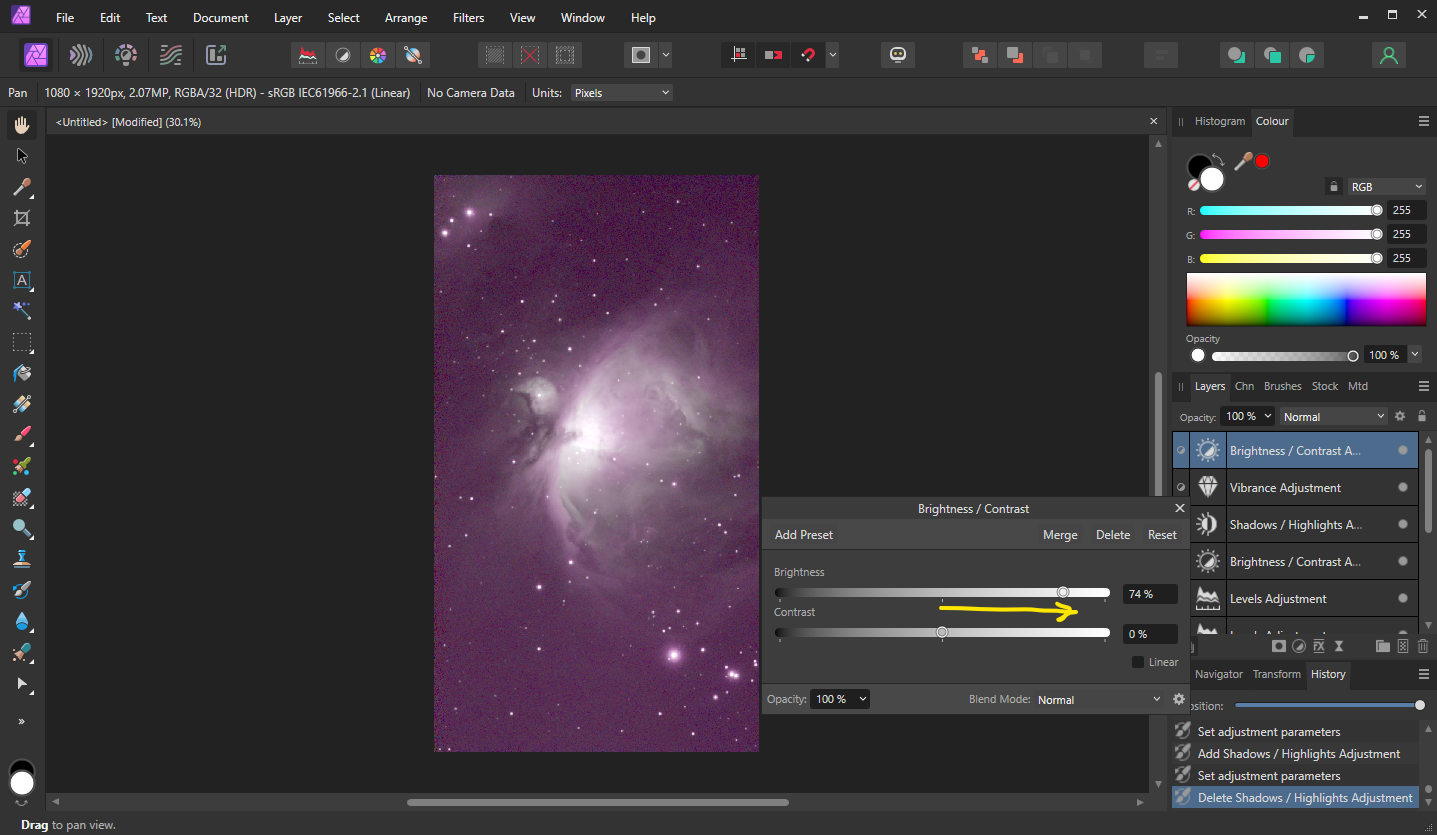
Open a "Brightness & Contrast" layer and slide the Brightness slider to the to the right. Click the X to close the box.
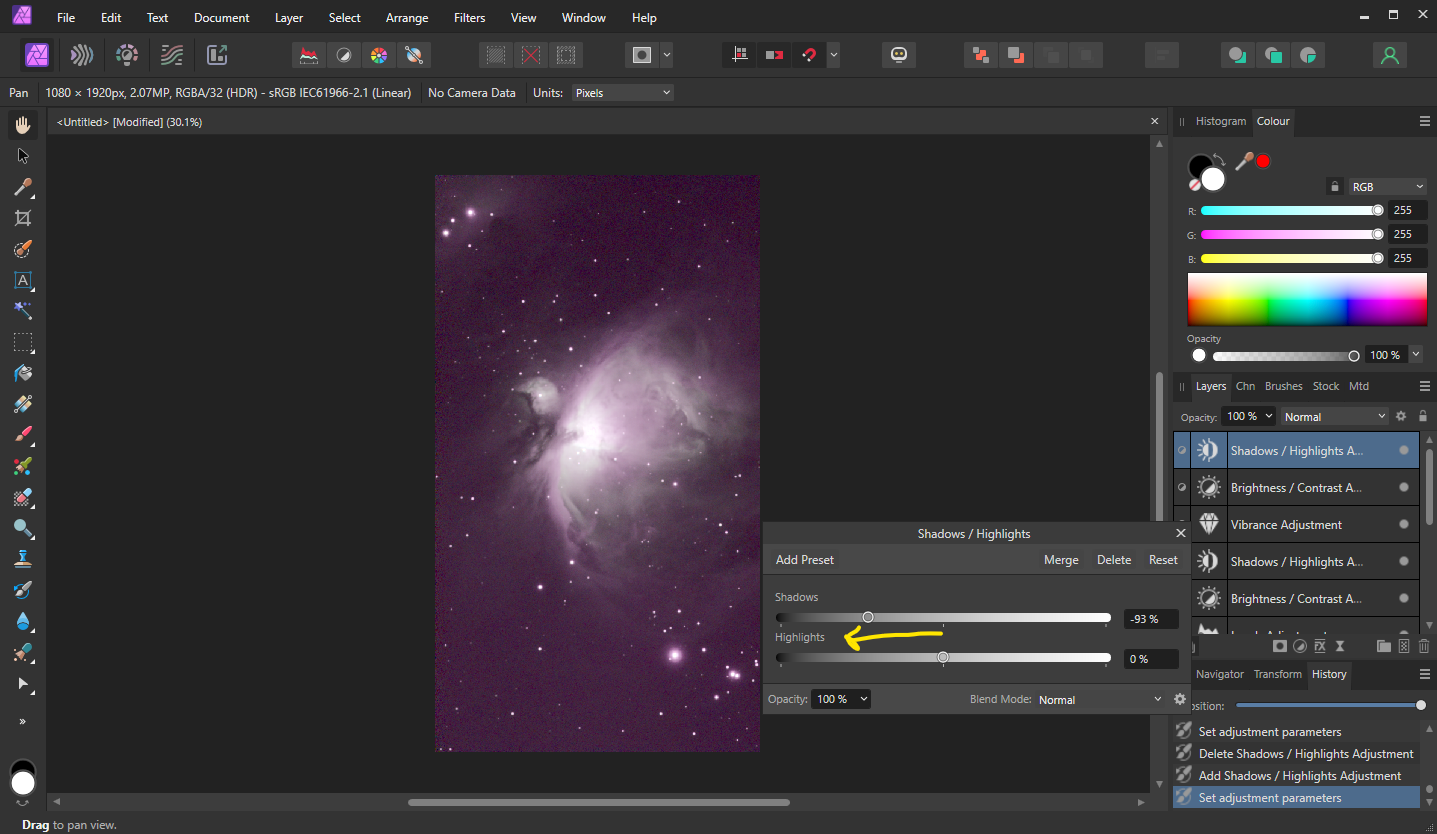
Finally open a "Shadows & Highlights" layer and slide the Shadows slider to the to the left. Click the X to close the box.
If you are happy then you can now export the image from the "File" menu on the top bar or further edit the image.
This is by no means the full processing proceedure and everyone has their own ways to process or a particular order that you need to follow, but by following the above will get you a decent image and it will also give you an idea of what some of the basic things do in Affinity.